Monday, September 29, 2014

Chapter 3: Tonal Effects in Machine Stichery

The following samples were machined with the presser foot on using zig zag, straight stitch and a couple of embroidery stitches. All samples were worked on a double layer of cotton fabric for stability, with black polyester sewing thread in the bobbin and on top. All samples are approximately 4 inch square.


Details of samples:
(i) Zig zag - altered stitch length, also widened gaps between lines of stitching.
(ii) Zig zag - altered stitch length only, inserting a few lines of very short zig zag stitches btween larger stitches to close up gaps. I like the lacey effect this produced.
*
(iii) Zig zag - altered stitch width only; widening gaps.
(iv) 4 way zig zag - altered stitch width, widened gaps at edges.
*
(v) Zig zag - changed position of needle in machine while stitching, increasing size of stitch in increments; also widening gaps.
(vi) Feather stitch - adjusted width and stitch length, progressing from small to large; overlapping.
*
(vii) Honeycomb stitch - lines of same sized stitching working from small to large, adjusting width and length in each line; also adjusting spacing between lines of stitching.
(viii) Straight stitch - taking straight stitch for a walk! Unbroken line, swivelled and turned.
*
(ix) Zig zag - similar to (viii) above but taking zig zag for a 'walk' this time!
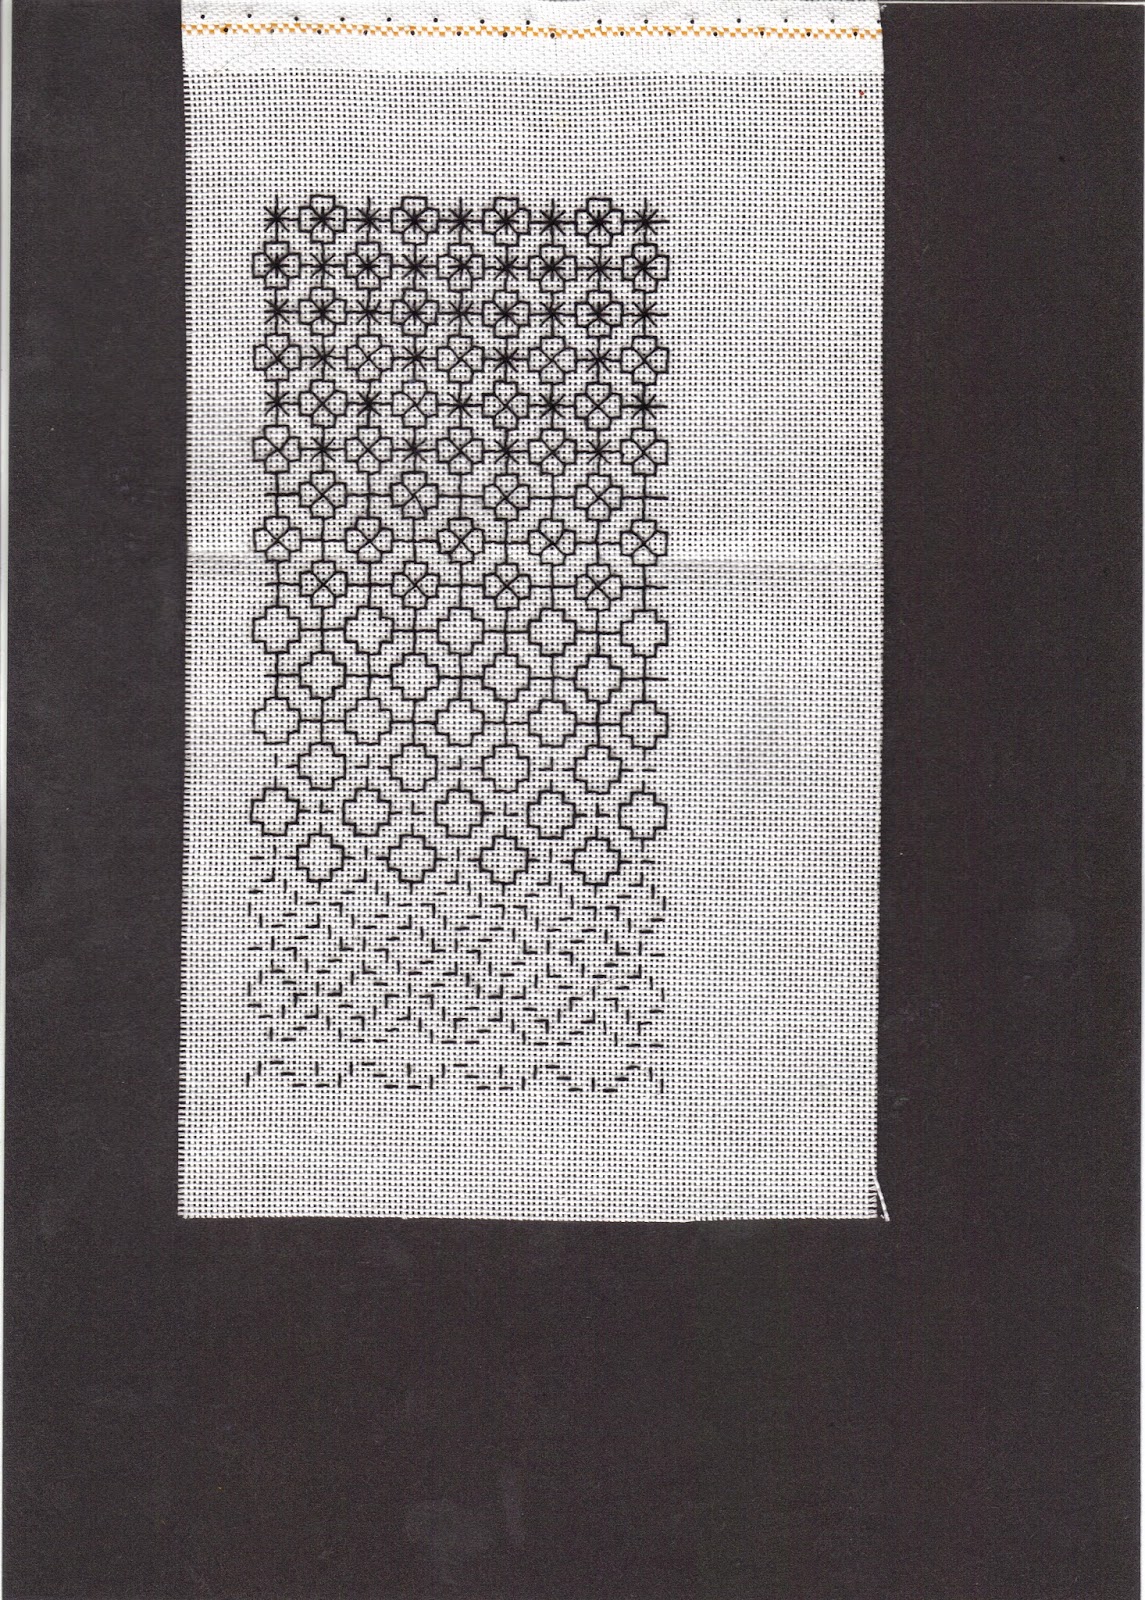
(x) Cross stitch - altering balance, widthways and lengthways. Also widening gaps between lines of stitching.
*
(xi) Zig zag - lines of zig zag, varying width and lengthalong each row; overlapping lines of stitching; widening spaces.
(xii) Inner circle, outer stitching, altered width and length of zig zag.

Thursday, August 21, 2014

Module 2: Chapter 2 - Stitched Tonal Studies

A. Tonal column in stitchery


This sample was stitched on 10 holes to the inch canvas, in freely worked cross stitches, massed on top of one another and overlapped. Threads were black and white pearl cotton #8 and fine threads.

B. Tonal effects using the technique of blackwork


Designs above based on traditional blackwork patterns. Drawn on to graph paper with a black marker/ Patterns can be both added to, to make darker, and subtracted from, to make lighter, thus altering the tones through addition and subtraction of lines.

C. Blackwork tonal columns

(i) Using pattern development I created a darker tone, working a few rows before adding to the pattern.


(ii) Using spacing of the stitches: In this sample the spacing between the stitches controlled the tones.


(iii) Using thickness of thread: The threads used progressed from fine black sewing thread to a single strand of stranded cotton, then flower thread,  pearl cotton #8, 3 strands of stranded cotton, and finally 6 strands of stranded cotton. In this sample the spacing remains constant, only the thread thickness is altered.


Tuesday, March 11, 2014

Chapter 1 - The Study of Tone

For this chapter of tonal columns, I used a variety of media, including: charcoal, black ink, black Brusho paints, water soluble markers and crayons, black sugar paper (punched for circles), white tissue paper, and a variety of black, grey and off-white images from a glossy magazine, as well as the sides of a whiskey hip flask for a crayon rubbing! :)
The columns were 7 cms wide and the length of an A4 page.
Sample #1: [left hand side] black charcoal stick
Sample #2: [right-hand side] calligraphy pen

Sample #3: [left-hand side] black ink and a cotton bud
Sample # 4: [tight-hand side] rubbing of side of hip flask with black child's crayon.
Sample #5: [left-hand side] Brusho paint applied with the edge of a credit card
Sample # 6: [right-hand side] water soluble marker, lightly brushed with water#
Sample # 7: [left-hand side] punched circles from black sugar paper
Sample # 8: [right-hand side] black colouring pencil, cross hatching
Sample #9: [left-hand side] black ink applied with scrunched up kitchen roll
Sample #10: [right-hand side] black water soluble crayon, brushed with water
Sample # 11: [left-hand side] black, grey and off-white papers torn from a glossy magazine
Sample # 12: [right-hand side] column painted with black Brusho paint leaving just lower end clear, then stuck torn pieces of tissue paper scattered on top. This column is my mixed media sample.

MODULE TWO: 'Animal Magic' - Introduction

Collect visual information:


Make a list of associated words that describe your subject:

Mark Making:

Resolved Sample


Resolved sample mounted on white mounting board.

Tuesday, December 17, 2013

Costing and Time Recording; Health and Safety; References

Costing and Time Recording

COSTING:
[Note: Most of the following materials I already owned, so these figures are estimates based on amount used.]
Papers, including cartridge, tissue, tracing paper, abaca paper– E3
Inks, paints, dyes – E5
Fabrics, threads (machine and hand) – E5
Soluble fabric – E2
Ribbons, beads – E4

TIMING:
Date when design work was started:  February 2013           completed: June 2013
Date when embroidered item was started:   November 2013            completed: December 2013
Total hours spent working on design work:  40 hours         embroidery:  20 hours

HEALTH AND SAFETY

DYEING:
*Avoid inhaling dye powder or dye vapours. Work in a well-ventilated area.
*Keep all dye stuffs in secure, well labelled containers. Keep away from children.
*Keep dye equipment separate from cooking utensils. Use only for dyeing.
*Don’t eat or drink when dyeing.
*Wear old clothes and/or an apron when dyeing. Also use rubber gloves.

SEWING MACHINE:
*Use in well-lit area. Table and chair should be correct size to ensure comfortable working height and ease of access.
*Socket should be close by to avoid trailing cables and flexes.

LIGHTING:
*Ideally you should be able to work close to a source of daylight, but failing this try and use daylight bulbs in your lamps. Ensure working area is well-lit to avoid eye strain.


BOOKS REFERRED TO WHEN WORKING THROUGH MODULE ONE

*STITCHES: NEW APPROACHES, Jan Beaney (Batsford, 2004)
*STITCH, DISSOLVE,DISTORT WITH MACHINE EMBROIDERY, Valerie Campbell-Harding & Maggie Grey (Batsford, 2006)
*FRAGILE FABRICS, Jan Beaney & Jean Littlejohn (Double Trouble Enterprises, 2009)
*GRIDS TO STITCH, Jan Beaney & Jean Littlejohn (Double Trouble Enterprises, 2006)
*BLACKWORK, Becky Hogg (RSN Essential Guide Stitch, Search Press, 2010)


EVALUATION OF COMPLETED WORK

The completed embroidered assessment piece for Module One is a Resolved Sample based on the idea of ‘Growth and Disintegration’.

How do you feel about the resulting conclusion?
-          I thoroughly enjoyed creating my Resolved Sample. I especially enjoyed rising to the challenge of sampling new-to-me techniques, including using ‘sticky’ soluble fabric, laying grids in place before stitching, hand stitching on soluble fabric, and beading on soluble fabric. Soluble fabric seems to me to be an ideal medium to use in a piece based on the theme of ‘growth and disintegration’.

Is it fit for its purpose? Give reasons.
-          I believe that my Resolved Sample fulfilled the criteria. Having laid down a basic grid I then free machined everything in place ensuring that all stitching connected at some point in order to ensure that the piece didn’t completely disintegrate! Then the real fun began – using a combination of hand stitching and beading to build up certain areas making these small sections ‘grow’, while leaving other areas less stitched and more open in order to suggest ‘disintegration’. The use of herringbone in the background sections worked particularly well, especially as some areas were left un-stitched which created an open, lacey appearance. The edges we left raggy to emphasise the ‘disintegration’ aspect.

If you were asked to make it again, what changes would you make to the way you designed it, and the way you made it?

-          If I was to design and make this again I would devote more time to the pre-planning which areas to leave more open (‘disintegration’) and which to build up with stitch and beading (‘growth’). Even though I thought I had planned it all thoroughly, I could have done more at the designing stage. Possibly is I had worked an initial sample of my Resolved Sample first, before embarking on the actual Resolved Sample, I might have produced a more dramatic example of the theme of ‘Growth and Disintegration’. Certainly a lesson to bear in mind for the next module!