(1)
Shibori dyed (arashi) cotton, seamed with piece of loosely woven dyed cotton, which was frayed down to the seam. Alternated groups of threads which was then stitched over with an automatic embroidery stitch (c-58) on my Bernina machine.
(2)
White satin ribbon stitched with automatic machine stitch (c-72). Stitched to 1 edge of black fabric, using free machine zig zag, length set to 0, and imitating curves of automatic embroidery stitch. Repeated on other side.
Reverse side :
(3)
2 pieces of shibori stitched loose woven cotton, with 2 layers of thinner strips of white loose woven cotton inserted into seam, which was then frayed. Darker fabric whip stitched to echo lines of shibori , varying length and width of zig zag stitch.
(4)
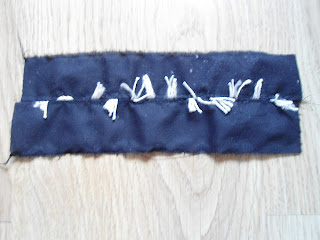
4 lengths of thread knotted at top to hold all strands together - 2 strands of hand spun bamboo and 2 strands of rayon. When seaming the pieces of black fabric together I was careful to arrange the threads in loops. Next I stitched the loops down in alternate arrangement.
Reverse side: Snipped loops
(5)
This was a fun sample to design and stitch. I began by heavily stitching 2 wide strips of black and white fabric, using an automatic embroidery pattern (c-72), feed dogs lowered and darning foot used. These strips were then cut in half, and then stitched back together, before cutting and re-stitching again. Next I cable stitched over everything and used it as a wide seam insertion between some commercial black and white spotted fabric. 3 strands of rayon thread were zig zagged together to make a cord. I attached the cord over the seam lines with a zig zag stitch.
Reverse side: [photographed under different light!]
IDEAS FOR TRIMMINGS
A. RIBBONS
(6)
Freely stitched automatic pattern (c-72) with feed dogs lowered and using darning foot, swivelled while stitching by moving fabric. Placed on shibori dyed fabric with free machines zig zag swivelled, altering width as I went.
(7)
Strip of black cotton fabric attached to loose woven white cotton. Lines of "swinging stitches" using automatic embroidery stitches (c-72) settings as normal, and stitched while swinging the fabric. Edges of white fabric frayed.
(8)
4 layers of cotton, in decreasing widths, stitched down centre to hold all layers together. 3 loosely woven for ease of fraying and second layer pre-stitched with zig zag varying the width and length of stitch, curving lines as I sewed. Loose woven cottons frayed back to stitching.
(9)
Black fabric stitched with free machined automatic embroidery stitch (c-72) swivelled while stitching - feed dogs lowered, darning foot and hoop used. Stitched initially on larger piece of fabric and then cut to size. I wanted to see if using a hoop made any difference to the stitching but since I was also using a darning foot it didn't!
(10)
3 layers of cotton fabric, loose woven, different widths, stitched with step zig zag, varying lengths and widths. All edges frayed.
CORDS
(11)
This cord was made from 2 strips of cotton, one black and one white. Tied into a series of knots.
(12)
This cord was made from 3 strips of cotton, grey, white and black, which were plaited and then knotted at the top and the bottom.
(13)
Scrap from free form piece in previous chapter 7, rolled and twisted, then zig-zagged at widest width.
(14)
Handspun bamboo, finger crocheted, then knotted at intervals. Free machined using darning foot, zig-zag at widest width, length set to 0, tension normal.
(15)
Twisted strip of frayed shibori dyed fabric, zig zagged to hold in place.
TOGGLES
(16)
Made toggles with 2 narrow strips of black and white fabric. Embroidered with automatic stitch (c-74), normal tension, feed dogs up, swivelled while stitching. Both strips stitched. Sewed a black strip with a white one, using same stitch, but this time black thread on top and white in bobbin. Interestingly I expected that the black stitching would show up clearly against the white fabric, but instead I got a speckled grey. The white bobbin thread showed up clearly against the black. Made 3 toggles. Edges left to fray. Tied into toggle, then inserted in seam. Decorated the the black and spotted white fabric with multiple rows of free machined automatic stitch (#19).
(17)
I tired to pull a few of the elements explored above into a final sample. Instead of stitching seams by placing fabrics directly against one another to create a normal seam, I decided to try overlapping the fabrics instead, leaving enough fabric to allow for frayed fringes. I really like the effect and will definitely use this in the future. The beaded toggles at the top were created by rolling up strips of fabric which were first pre-frayed along the 2 longer edges and 1 short edge, then held in place with black thread. Sewn in place by hand. The 2 lines of cording were made with rayon thread and size 11 beads threaded on to sewing thread and then held parallel to rayon while free machine zig zagging along length - feed dogs down and darning foot. It was a bit of a challenge to move beads under darning foot.
References used when making samples for this chapter:
Machine Embroidery, Stitched Patterns, Valerie Campbell-Harding
Edges & Finishes in Machine Embroidery, Valerie Campbell-Harding


